
What checks are needed when setting up a DeltaLINK-Cloud modem gateway after a period of storage?
You may choose to shut down your DeltaLINK-Cloud modem once the growing season is over (e.g. Winter). When setting up the equipment again for the next growing season, it’s important to perform a few checks, just to make sure everything is working ok.
-
- Re-charge the 12v battery before redeploying otherwise the modem won’t have any power to start up. If you need a battery charger for the LBAT4 battery, please contact sales@delta-t.co.uk.
- Make sure the aerial/antenna is connected securely and is mounted as high as possible.
- Make sure all loggers are connected to the modem box/kit. Check the cables for any damage that may have occurred during storage. If replacement cables are needed, please contact sales@delta-t.co.uk.
- Connect the 12v battery to the power leads in the modem box or, if you are using the kit in a steel enclosure, make sure the battery is connected directly into the logger power terminals and the modem is connected to the logger using the 5-way M12 connector.
- Check the modem status LED (note, the modem may take a few minutes to connect to the network and display the correct LED flashing code):
2G FX009 modem:
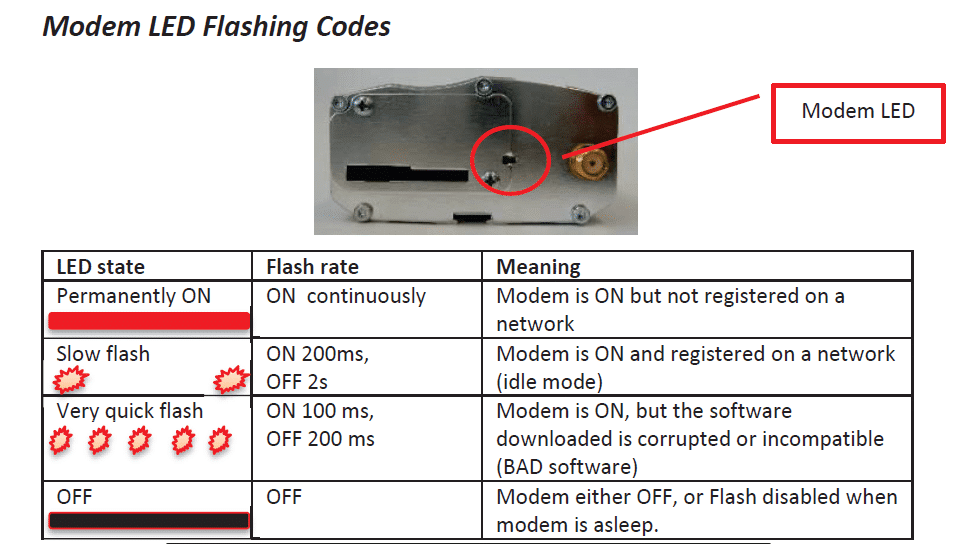
********It should be displaying a ‘slow flash’.********
2G/3G FX30 modem:

********It should be solid Amber********
- If the status LEDs (‘modem LED’ on 2G modem and ‘power LED’ on 2G/3G modem) indicate no power, check:
– The battery and power leads are connected to the modem.
– The solar charge regulator has green LEDs lit up on it (check wiring if LEDs are red)
– Check any fuses in the cable. - If the status LEDs show that the modem is not connected to a network, check the local network service – there may be a tower down. Also, check there is a SIM pushed into the modem SIM card slot, it should be ‘clicked’ into place and the cover latch is slid across on the 2G modem. For the 2G/3G FX30 modem, you may need to remove the cover plate.
- If the status LEDs are ok, log into DeltaLINK-Cloud and check the gateway status, it should connect within your sync time frame. It might be worth changing the sync rate to every 15minutes whilst it reconnects. This will increase the number of connections so you can check it more rapidly. Once the connection has re-established, the sync rate can be changed back to its previous setting.
- Always make sure that the same loggers are used with the same modem gateways before trying to connect. This will avoid any additional set up routines. If different loggers are used with different modems, then you’ll need to make sure that:
– The serial number for the logger has been entered correctly.
– The logger hasn’t already been registered on another user’s account – if it has, you’ll need to delete it from the other user’s account before registering it on your own account with the different modem gateway.
– Equally, make sure that you’re using your own modem gateways that are already registered to your account. If you are borrowing one from another user, you’ll need to ask them to delete the modem gateway from their account before registering it on your own account.
You can check the logger serial number by opening the lid and looking at the number printed on the circuit board inside. Alternatively, you can communicate with the logger using the DeltaLINK software on a laptop. The opening DeltaLINK screen shows the logger serial number in one of the information fields. - If there are any problems with the modem status LED or the connection cannot be resolved, please do get in touch with Delta-T technical support (tech.support@delta-t.co.uk).